ServerFree Architecture
What if Serverless Meant No Backend Servers?
By now, everyone knows that serverless doesn't actually mean without servers; it just means using someone else's servers. But what if it really meant no servers at all? What if you could run your code entirely without any servers? You might be thinking, "That's just desktop applications," but that's not what I'm referring to. What if we could run a traditional web app, composed of frontend code, that talks to an express-like server and saves data in a database, all without any servers? No backend servers, no containers, no virtual machines, nothing. Just code, a browser (well, and a place to serve our static files from, which technically is a server).
I'll call this the ServerFree™ architecture.
TL;DR
This article demonstrates how to build a web application that is packaged to run in the browser, including the database. The frontend code is build as usual, the backend is packaged and runs in a web worker and for the database we use SQLite compiled to WebAssembly.
The code for the demo app is available on github.
A live version is running on https://my-way-track.vercel.app/.
The article is split into a few sections. The first few cover the building of our application with a classic architecture using subZero libraries, the last section covers the conversion to a ServerFree architecture.
- First attempt with a classic architecture (the easy part)
- MVP V1 (small detour with Turso DB)
- Converting to ServerFree architecture (the fun part)
The Idea
One morning, as I was contemplating ways to procrastinate on doing marketing for SubZero without feeling guilty, an idea struck me. "I know, I'll engage in some content marketing... but what do I need for that? Oh, a cool demo project!" And just like that, I found a way to spend a month doing content marketing writing code.
Lately, it seems like most developer-focused content leans more towards spam than substance. You see titles like "Build <thing> in 5 minutes" or "Create a <fang> clone in 1 hour (with our SaaS)," but once you scratch the surface, they often turn out to be another trivial todo/blog/chat app that nobody really uses.
I wanted to create something different, something genuinely useful. While seeking inspiration on Hacker News, I stumbled upon Show HN: A job application tracker with company reviews, recruiter autoresponder. It looked like a useful tool, one that could be built reasonably fast using the SubZero stack.
However, looking through comments, one thing caught my eye: A lot of people commented on the privacy aspect of the app. This is where the things derailed a bit from a one day demo project to a "down the rabbit hole of web workers, incompatibilities, missing documentations and other fun stuff" project.
And that, boys and girls, is how one inadvertently invents a new architecture instead of sticking to marketing like a sane person.
First attempt with a classic architecture (the easy part)
The database schema
So i fired the subzero cli and after a quick npx @subzerocloud/scaffold@latest new, changing the database schema and configuring permissions, i had a reasonably functioning app. This took a hole 10 minutes, I know this is like ages compared to other tools accomplish things in "literally seconds" but what can I say...
While this already has some powerful functionality (full CRUD and filtering, just by introspecting the database schema), I want to build something that is closer to a product than a demo. So, let's do some UI customization. You'll see that the backend functionality is so powerful that we never have to touch the backend code (server.ts, which is like 200 LOC).
Better Layout
The first thing we'll change is the layout. There's a lot of wasted space on the left side, so let's move the sidebar to the top.
Here is the commit that accomplishes this: Change Layout.

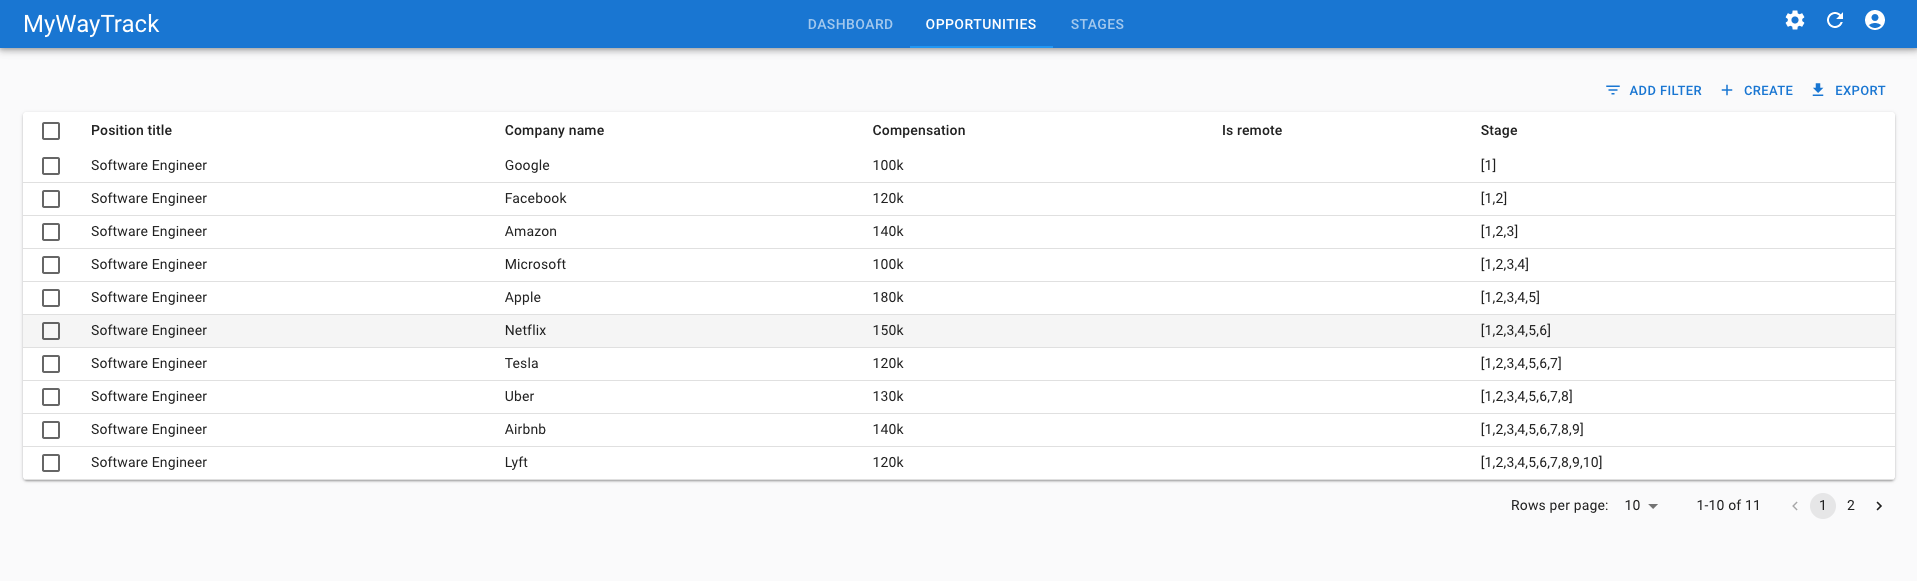
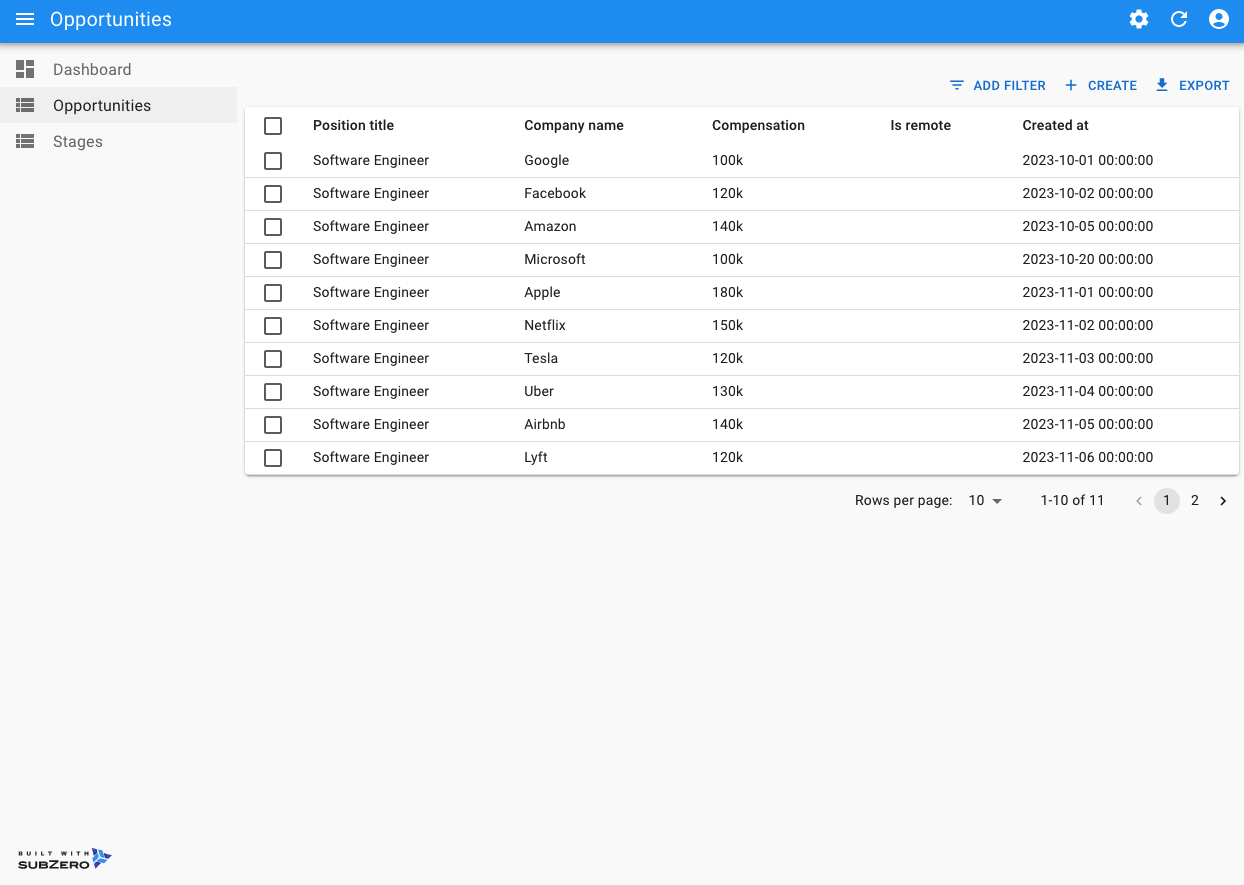
Custom Components for Opportunities
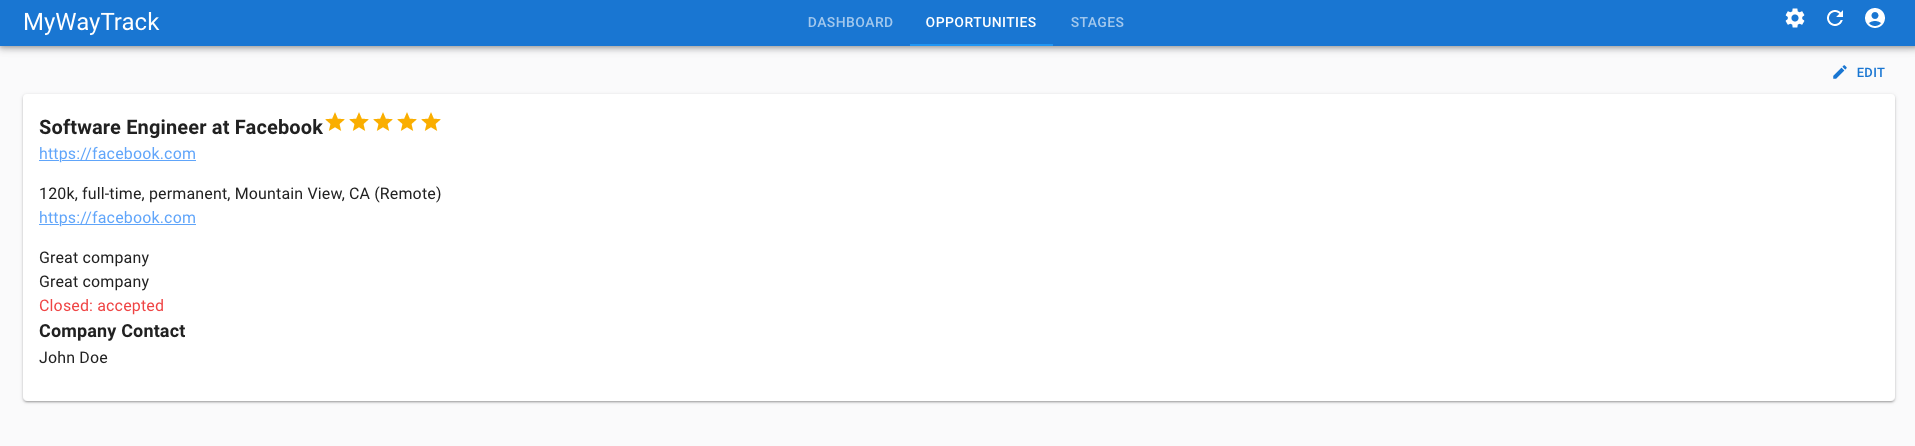
Next, we'll turn our attention to the "Opportunities" page, since this is where the main functionality of the app is provided. We'll add custom Show, Create, Edit, and List components for the Opportunities. The list page will also contain a custom filter component.
Here is the commit that accomplishes this: Custom Opportunities Components.


A few notes on the changes above:
Notice that
App.tsxreceived almost no changes; we essentially instructed it to "use these custom components when rendering pages for this model."For Create and Edit, we used the same
OpportunityFormcomponent, which is devoid of "logic." It only defines the components to be used for each field.The Show page features the
OpportunityShowcomponent, which also requires no complex logic. Simple HTML with some Tailwind classes gets the job done.On the List page, we have some very light formatting logic for a few fields. The key component here is the
OpportunityFilter. While it primarily consists of declarative JSX code and lacks intricate business logic, the filtering capabilities it enables are remarkably powerful and flexible. This showcases the thoughtful design of React Admin. By defining ourDatagridandFiltercomponents, the library orchestrates the interactions between lists, filters, and the backend API, eliminating the need for explicit logic like "when I click this button, call this API and update the list with the results."Lastly, I want to highlight that we've implemented complex flows, especially for filtering, without needing to add any custom backend endpoints to handle the complexity.
If you've looked at the commit following the one mentioned earlier, you might have noticed a small change in server.ts. At first glance, you might think, "Aha, they did have to change the backend code." However, this particular case highlights the flexibility of SubZero rather than its limitations. Let me explain.
In our database schema, we used a column named stage_ids to hold the IDs of completed stages for each opportunity. In the filtering component, we aimed to provide a way to display opportunities that completed a specific stage. The SubZero REST API, which follows the PostgREST specs, has a filtering operator called cs. This operator, corresponding to PostgreSQL's @> operator, checks if a value is contained in an array. Our database, however, uses SQLite, which doesn't natively support this operator. Many people overlook SQLite, thinking it lacks certain features they need. But SQLite is highly extensible, allowing the addition of custom functions. We added a custom function to SQLite that implements the @> operator (the cs function). Now, we can effectively use this in our filtering. Neat, right?
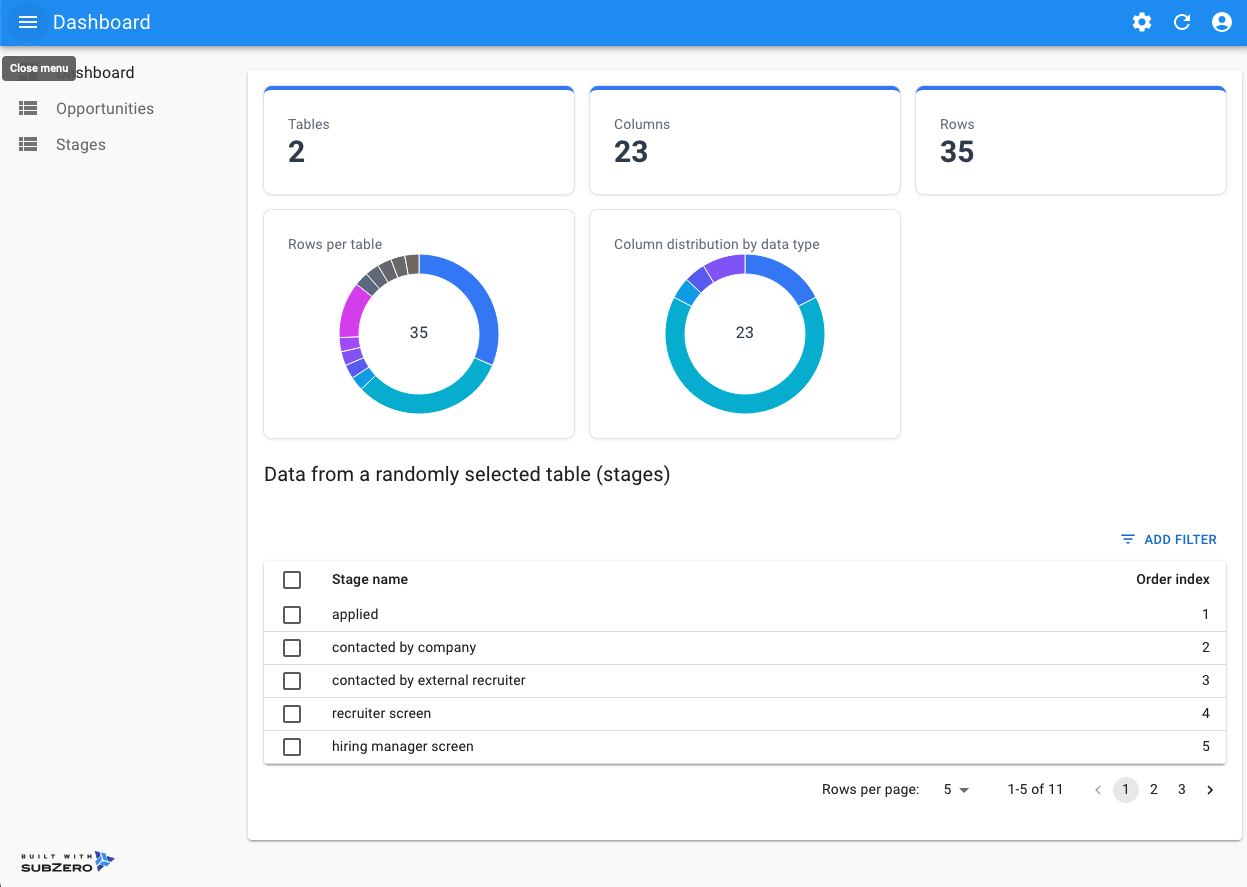
The Dashboard
At this stage, we have a fully functional app, but the Dashboard displays only some generic information about the number of tables and columns in our schema. Let's enhance it to show more relevant data, such as "Open Opportunities," "Average Progress / Application," and "Average Days Since Application."
Here is the commit that accomplishes this: Custom Dashboard.

While you might expect some complex rendering logic for those visually appealing panels and charts, you'll be pleasantly surprised to find that the code is quite simple, thanks to Tremor. All you need is the data to display, and here, the power of the SubZero REST API shines through. Once again, we did not need to write any custom backend code to achieve this.
Take a look at these beauties in Dashboard.tsx:
// get the number of applications per week
client
    .from('opportunities')
    .select(`
        week:$strftime('%Y-%W', created_at),
        total:$count(id)
    `)
    // @ts-ignore
    .groupby('week')
    .then(({ data }) => {
        setPerWeekApplications(data);
    });

// get the average number of days the applications are open
client
    .from('opportunities')
    .select(`
        $avg($sub($unixepoch(updated_at),$unixepoch(created_at)))
    `)
    .is('close_reason', 'null')
    .single()
    .then(({ data }:PostgrestSingleResponse<any>) => {
        setAvgDaysOpen(Math.round(data.avg / 86400));
    });
MVP V1 (Small Detour with Turso DB)
At this point, we have a nice-looking, fully functional app, complete with a backend server, a database, and a frontend. It would be a shame not to explore how we can package this classic architecture into a single deployable unit for production. So, let's do that.
The docker image
Deploying this to production is a matter of building the image:
docker build -t my-way-track .
seeding the database:
(cd db && sqlite3 production.db < init.sql)
and running the container:
docker run --rm \
-p 3000:3000 \
-e JWT_SECRET="<LONG_JWT_SECRET_GOES_HERE>" \
-v "$(pwd)/db/production.db:/app/app.db" \
my-way-track
Now, the application can be accessed at http://localhost:3000, but logging in isn't possible because the test user, which was being created by the SubZero development tooling, is no longer there. Therefore, we need to create a user.
First, we'll need an env.production file to store some configuration settings for the SubZero CLI, enabling it to connect to the production instance of the app.
Save the following in env.production:
API_EXTERNAL_URL=http://localhost:3000/auth
GOTRUE_JWT_SECRET=<LONG_JWT_SECRET_GOES_HERE>
Now we can use the cli to create the user:
CONFIG_PATH=.env.production npx auth-cli users create
Check the user was created:
CONFIG_PATH=.env.production npx auth-cli users list
Meet Turso DB
We now have the Docker image and can deploy it anywhere we want, but there's still one aspect that's not ideal: the database. The SQLite database file needs to live outside the container to persist data between container restarts. While services running our container might offer vendor-specific ways to persist files, this isn't ideal. Wouldn't it be nice if we could access SQLite with a connection string, similar to PostgreSQL or MySQL? Thanks to Turso DB, this is now possible. With this service/technology, we've solved our SQLite database persistence and backup issues in one stroke.
The SubZero library has built-in support for Turso DB, so all we need to do is replace the better-sqlite3 client with the Turso DB client, and we're set. Check out the commit that implements this change.
Sign up for a free account at https://turso.tech/ and create a database. Use this walkthrough to set up the Turso CLI and create a database.
Once the database is created (in the commands below, we've named the database mywaytrack), seed it like this:
turso db shell mywaytrack < db/include/schema.sql
Get the connection string for the database:
turso db show mywaytrack
Get the token for the database:
turso db tokens create mywaytrack
Rebuild the docker image:
docker build -t my-way-track .
Run the container:
docker run --rm \
-p 3000:3000 \
-e JWT_SECRET="<LONG_JWT_SECRET_HERE>" \
-e DB_URI="<turso_connection_string_here>" \
-e TURSO_TOKEN="<TURSO_ACCESS_TOKEN_HERE>" \
my-way-track
Create the user:
CONFIG_PATH=.env.production npx auth-cli users create
Now we have a way of deploying and restarting our app without losing the data in our SQLite database.
Converting to ServerFree Architecture (The Fun Part)
Here's how all the components fit together and what we are aiming to achieve:

Below, I'll go through each component, explaining how it works, the reasoning behind it, and the challenges I faced.
Most of the changes were implemented in this commit.
SQLite Compiled to WebAssembly
If, like me, you spend a lot of time on HackerNews, you've probably heard about the version of SQLite compiled to WebAssembly. Though I've never seen it used in a real-world application, it's a core component of our ServerFree architecture. After all, everyone needs a database, right?
For storage, it offers options like localStorage and sessionStorage, which aren't very useful for our case — too small and volatile for my taste. However, it also supports using the Origin-Private FileSystem (OPFS). This is a relatively new development in the browser world, yet it's already supported by all major browsers.
There is a small catch, though, when using OPFS with SQLite: the code interacting with the database must run in a Web Worker. Additionally, when the worker script is fetched from the server, you need to set these headers:
Cross-Origin-Embedder-Policy: require-corp
Cross-Origin-Opener-Policy: same-origin
The Web Worker
We need to run our backend code in a web worker, primarily because we're using SQLite with OPFS. Fortunately, this requirement works in our favor, as it allows the backend code to run on a separate thread, preventing the UI thread from being blocked.
To make our code compatible with a WebWorker environment, we mostly needed to eliminate dependencies on NodeJS-specific APIs and replace them with browser-compatible ones.
The server code was using Express, primarily for routing and the HTTP server – functions that rely on NodeJS-specific APIs. To address this, I replaced Express with itty-router. Itty-router provides similar routing/middleware functionality but is browser-compatible.
I kept src/server.ts worker-agnostic, only exporting the router and init function. From there, the worker just needs to call
await router.handle(request, response, function (e) { throw e; });
This approach keeps things nicely separated, allowing you to essentially copy and paste the worker code into your own project, along with your custom server logic.
The Service Worker
The Service Worker is a lesser-known browser feature, and it was new to me before this project. Introduced in 2015, Service Workers essentially act as a proxy between the browser and the network. They can intercept requests and respond with cached data, enabling developers to build offline-first applications. However, they differ significantly from Web Workers, particularly in their lifecycle, and they're not intended for running application code (as the browser can terminate them at any time, causing loss of state). For a deeper dive into the stages of a Service Worker, check out this article.
Our interest lies in their ability to intercept requests made by the UI to the backend, allowing us to handle them in the worker. Initially, I tried running the entire backend in the Service Worker (not yet aware that the browser could terminate it anytime). However, I encountered a limitation: a specific OPFS capability was not available in the Service Worker environment. This meant I could not use SQLite from the Service Worker.
In the diagram above, you see a direct arrow between the Service Worker and the Web Worker. However, enabling direct communication between them was challenging due to the unpredictable start/stop nature of the Service Worker. The MessageChannel setup between them was lost randomly. Ultimately, a more reliable solution was to use the main thread as a proxy between the Service Worker and the Web Worker.
The Main Thread
In the main thread (UI), I eliminated the code related to authentication. If you think about it, in this context, you authenticate when you log in to your computer. Although you are navigating to a web page, you are actually interacting with files on your computer, which is no different than interacting with a document or an Excel file.
Conclusion
I believe this architecture holds a lot of potential, and I'm eager to see what people will create with it. There are many use cases where this architecture is particularly advantageous, especially when customer data is distinct and there's no need to share it between users.
Here are some key benefits of this architecture:
No Backend Servers: This is the most apparent benefit. You can provide a service at the cost of hosting a static website, eliminating concerns about scaling.
Privacy: Data is stored on the user's computer and never reaches your servers. This means less worry about complying with GDPR, CCPA, etc. One minor drawback is that the user needs to use the same computer/browser, but this can be addressed by providing a way to export/import the database.
Security: For sensitive data, such as medical records or financial information, you don't need to worry (as much) about encryption, data leaks, etc.
Offload Work from the Backend: With tools like Electric, you can sync part of the database to the client and route some requests/queries to be handled by the browser, which would otherwise burden the backend server. This can be achieved without major changes to your frontend code.